Saturday, September 19, 2009

XML to Class in .NET – XML Schema Definition Tool(XSD.exe)

Most of us faced the scenario that we need to deserialize the xml data got from a service or some other source to an object.So how can we do that?Lets have a look at that.
First of all i have an XML like,
<?xml version="1.0" encoding="UTF-8" ?>
<Orders>
<Customer Id="001">
<Name>Customer1</Name>
<Address>Address1</Address>
<EmailId>EmailId</EmailId>
<Items>
<Item Id="100" Name="Item1"/>
<Item Id="101" Name="Item2"/>
</Items>
</Customer>
<Customer Id="002">
<Name>Customer2</Name>
<Address>Address1</Address>
<EmailId>EmailId</EmailId>
<Items>
<Item Id="103" Name="Item3"/>
<Item Id="103" Name="Item4"/>
</Items>
</Customer>
</Orders>
So we need to generate a class from this XML.Here comes XML Schema Definition Tool or XSD.exe.So we are creating an XML Schema definition first from the above XML.
  • Go to Visual Studio>Visual Studio Tools>Visual Studio Command Prompt.
  • Navigate to the folder where we have the XML data or we can directly target the xml path.I am navigating to the folder having above xml and type the command xsd.exe Customer.xml and this'll generate a schema definition file Customer.xsd.

    XML Schema Definition looks like,
<?xml version="1.0" encoding="utf-8"?>
<xs:schema id="Orders" xmlns="" xmlns:xs="http://www.w3.org/2001/XMLSchema" xmlns:msdata="urn:schemas-microsoft-com:xml-msdata">
<xs:element name="Orders" msdata:IsDataSet="true" msdata:UseCurrentLocale="true">
<xs:complexType>
<xs:choice minOccurs="0" maxOccurs="unbounded">
<xs:element name="Customer">
<xs:complexType>
<xs:sequence>
<xs:element name="Name" type="xs:string" minOccurs="0" msdata:Ordinal="0" />
<xs:element name="Address" type="xs:string" minOccurs="0" msdata:Ordinal="1" />
<xs:element name="EmailId" type="xs:string" minOccurs="0" msdata:Ordinal="2" />
<xs:element name="Items" minOccurs="0" maxOccurs="unbounded">
<xs:complexType>
<xs:sequence>
<xs:element name="Item" minOccurs="0" maxOccurs="unbounded">
<xs:complexType>
<xs:attribute name="Id" type="xs:string" />
<xs:attribute name="Name" type="xs:string" />
</xs:complexType>
</xs:element>
</xs:sequence>
</xs:complexType>
</xs:element>
</xs:sequence>
<xs:attribute name="Id" type="xs:string" />
</xs:complexType>
</xs:element>
</xs:choice>
</xs:complexType>
</xs:element>
</xs:schema>
  • Now use command, xsd.exe Customer.xsd /c, for generate class from the schema definition file. It'll generate a class with default language as C#,customer.cs is generated in the folder and its having partial class Orders,
     /// <remarks/>
     [System.CodeDom.Compiler.GeneratedCodeAttribute("xsd", "2.0.50727.3038")]
[System.SerializableAttribute()]
[System.Diagnostics.DebuggerStepThroughAttribute()]
[System.ComponentModel.DesignerCategoryAttribute("code")]
[System.Xml.Serialization.XmlTypeAttribute(AnonymousType=true)]
[System.Xml.Serialization.XmlRootAttribute(Namespace="", IsNullable=false)]
   public partial class Orders {
Please note : you can see type OrdersCustomerItemsItem[][] for Items property and for its private variable.Change it as OrdersCustomerItemsItem[],Otherwise while Deserializing it'll show error.
  • By Using System.Xml.Serialization.XmlSerializer we can Deserialize the XML to Order object.

    private void PopulateData()
    {
        StreamReader stream = new StreamReader("Customer.xml");
        XmlSerializer serializer = new XmlSerializer(typeof(Orders));
        Orders orders = (Orders)serializer.Deserialize(stream);
    OrdersList.ItemsSource = orders.Items;
    }
  • Build and Run the application you can see the Customers displayed in the UI.

Friday, August 14, 2009

Implementing INotifyPropertyChanged

If an object implementing INotifyPropertyChanged Interface it’ll raise a property changed event when its property changes.Lets create a sample application to know how we can implement INotifyPropertyChanged Interface. I am creating a Silverlight application which demonstrates the data binding with both an object implementing INotifyPropertyChanged and also a normal DependencyProperty.
  • Open Visual Studio and select a new silverlight application.
  • Create a class named Customer in the silverlight project and implement INotifyPropertyChanged.
public class Customer : INotifyPropertyChanged
{
  • Define INotifyPropertyChanged Members,
public event PropertyChangedEventHandler PropertyChanged;

public void OnPropertyChanged(PropertyChangedEventArgs e)
{
   if (PropertyChanged != null)
   {
     PropertyChanged(this, e);
   }
}
  • In property setter invoke OnPropertyChanged by passing property name like,
private string _Name;

public string Name
{
  get
  {
     return _Name;
  }
  set
  {
    _Name = value;
    OnPropertyChanged(new PropertyChangedEventArgs("Name"));
  }
}
  • In MainPage.xaml.cs add an ObservableCollection of customer object as Dependency
    property inorder to make sure that UI is updating while we assigning that customer list
    to another list or object.If we are making it as a normal property UI will update only if
    we add new object to customerlist or any change occurs to the underlying properties.
public ObservableCollection<Customer> CustomerList
{
  get { return (ObservableCollection<Customer>)
GetValue(CustomerListProperty); }
  set { SetValue(CustomerListProperty, value); }
}

// Using a DependencyProperty as the backing store for MyProperty.
This enables animation, styling, binding, etc...
public static readonly DependencyProperty CustomerListProperty =
DependencyProperty.Register("CustomerList",
typeof(ObservableCollection<Customer>), typeof(MainPage),
    new PropertyMetadata(new ObservableCollection<Customer>()));
  • I also added a DependencyProperty FirstName in MainPage.xaml.cs just to show the binding of a simple DependencyProperty.
public string FirstName
{
  get { return (string)GetValue(FirstNameProperty); }
  set { SetValue(FirstNameProperty, value); }
}

// Using a DependencyProperty as the backing store for MyProperty.
This enables animation, styling, binding, etc...
public static readonly DependencyProperty FirstNameProperty =
  DependencyProperty.Register("FirstName", typeof(string), typeof(MainPage),
  new PropertyMetadata(string.Empty)); 
  • In MainPage.XAML add a datagrid and textbox and bind it to the ObservableCollection and DependencyProperty respectively.
<data:DataGrid AutoGenerateColumns="True"
 Width="400"
 Height="300"
 ItemsSource="{Binding ElementName=TestUC,
                                Path=CustomerList}"/>
<TextBox x:Name="NameTextBox"
Text="{Binding ElementName=TestUC, Path=FirstName, Mode=TwoWay}"
Width="100"
Height="25"
Margin="0,10,0,10" />
  • For Understanding PropertyChanged event, I added a button and just updating the customer object in the click event so that you can see the changes in the datagrid.When you change the property of Customer object from click event you can see that the UI is updating accordingly.
  • Download Sample Application.

Thursday, July 30, 2009

Silverlight With WCF Service

How to use a WCF Service from a silverlight client?Let us discuss how we can achieve that.Sample application is also attached in the bottom of this article.
    • Open Visual Studio and Create a new Silverlight application by selecting any of the available project templates in visual studio.Here i am selecting Silverlight Navigation Application,
image
image
This will create a silverlight project and a Web project in the solution.
    • Right Click the solution and Add a New WCF Service Application,
image
    • Create service methods in the WCF Service Application.
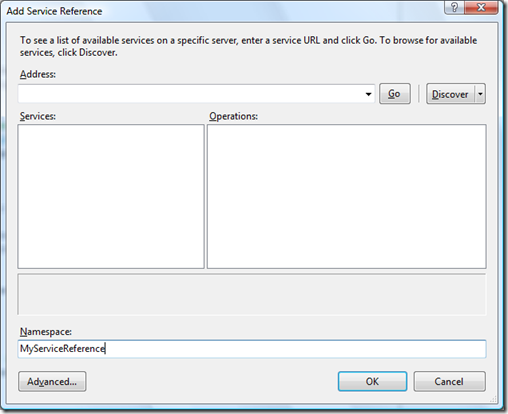
    • Add Service Reference to the Silverlight application by right clicking it and select Add Service Reference.
image
    • Add crossdomain.xml file to the WCF Service Project for enabling silverlight application to access the WCF Service.If WCF service is hosted in a web application then add policy file to the web application.
    • Try to access the service methods in silverlight application using the service reference added.
    • Download Silverlight & WCF Service Sample Application.If you get any run time errors for the sample application then delete and add the service reference again in the silverlight project.


Another sample application - A Silverlight RSS Reader

Thursday, July 23, 2009

Microsoft Tag Reader

Today i installed Microsoft Tag Reader in my Mobile - N73 Symbian S60 3rd Edition.Application will decode a tag printed some where by using the mobile camera and also open the related web content.
Download Tag Reader for your mobile and try it out.Its cool.

Silverlight 3 Features

Resources for Silverlight 3 ,

Monday, June 29, 2009

Immediate Loading Relational Data in LINQ to SQL

In LINQ to SQL the relational data is loading only when we refer that data, other terms its lazy loading of data.But we can load relational data ,suppose we have an Employee Table and also having an Employee details table related to Employee Table, we can load that relational data using DataLoadOptions while querying the context.
DataLoadOptions options = new DataLoadOptions();
options.AssociateWith<Employee>(p => p.EmployeeDetails.
Where(q => q.IsActive == false));
options.LoadWith<Employee>(p => p.EmployeeDetails);
Context.LoadOptions = options;
var emp = from p in DataContext.Employee
where p.EmployeeID == employeeID &&
p.IsDeleted == false
select p

Thursday, May 28, 2009

Microsoft Surface Videos

Watch some cool Microsoft Surface Videos here.
Hope you’ll enjoy.

Wednesday, May 27, 2009

AjaxControlToolkit New Version

AjaxControlToolkit version 3.0.30512 is released with  3 new controls,
  • HTMLEditor
  • ComboBox
  • ColorPicker

Friday, May 22, 2009

Visual Studio 2010 Professional Beta 1

Finally here comes what we’ve been waiting.Next Generation of Visual Studio is on move.Visual Studio 2010 Professional Beta 1 is now available for Download.
Enjoy

Tuesday, May 19, 2009

ElementMenu in Microsoft Surface

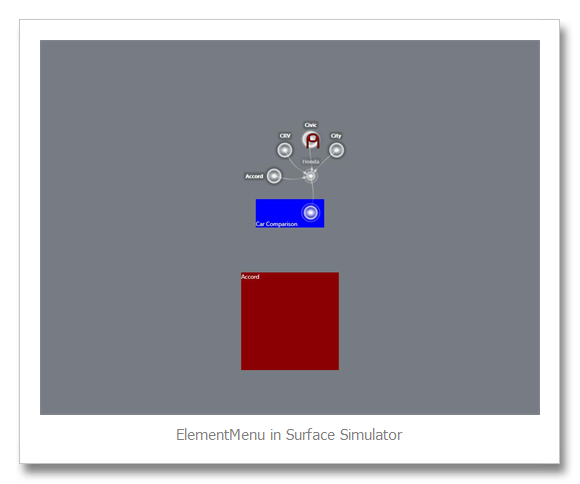
Microsoft Surface 1.0 SP1 introduced a new control named ElementMenu.ElementMenu in surface SDK provides you a new way to display the data in a new hierarchical manner.ElementMenu implementing SurfaceItemsControl and its a collection of ElementMenuItem.I created a sample application using this ElementMenu just to checking out how its looking.Of course its pretty cool.

Create a Surface Project.In surfaceWindow1 add ElementMenu Control from Toolbox.

<s:ElementMenu Name="MainMenu">

</
s:ElementMenu>
Add child ElementMenuItem controls.

<s:ElementMenu Name="MainMenu"
VerticalAlignment="Bottom">
<
s:ElementMenuItem Header="Honda">
<
s:ElementMenuItem x:Name="MenuItem1"
Header="Civic"
Click="MenuItem1_Click" />
<
s:ElementMenuItem Header="CRV"
Command="local:SurfaceWindow1.MenuItemCommand" />
<
s:ElementMenuItem Header="City"
Click="MenuItem1_Click" />
<
s:ElementMenuItem Header="Accord"
Command="local:SurfaceWindow1.MenuItemCommand" />
</
s:ElementMenuItem>
</s:ElementMenu>
Here i added two levels of ElementMenuItem for the ElementMenu.We can handle the click event by either using Click Event handler or using Command.Here i am using both for different Element Menu Items.Using Click Event handler is straight forward.But if we are using command first create a RoutedCommand in the code behind,

public static readonly RoutedCommand MenuItemCommand = new RoutedCommand();
Then add this command to the Window’s CommandBindings.Here am using XAML for adding the command to the command collection,

<Window.CommandBindings>
<
CommandBinding Command="local:SurfaceWindow1.MenuItemCommand"
Executed="CommandBinding_Executed" />
</
Window.CommandBindings>
where local is the reference to the current assembly,

xmlns:local="clr-namespace:MySurfaceApplication"
SurfaceWindow1 is the Class name.Add this command to the Element Menu Item as in the above code snippet.Add CommandBinding_Executed in the code behind,

private void CommandBinding_Executed(object sender, ExecutedRoutedEventArgs e)
{
CarDetails.Text = (e.OriginalSource as ElementMenuItem).Header.ToString();
}
So now my whole XAML looks like,

<s:SurfaceWindow x:Class="MySurfaceApplication.SurfaceWindow1"
xmlns="http://schemas.microsoft.com/winfx/2006/xaml/presentation"
xmlns:x="http://schemas.microsoft.com/winfx/2006/xaml"
xmlns:s="http://schemas.microsoft.com/surface/2008"
xmlns:local="clr-namespace:MySurfaceApplication"
Title="MySurfaceApplication">
<
Window.CommandBindings>
<
CommandBinding Command="local:SurfaceWindow1.MenuItemCommand"
Executed="CommandBinding_Executed" />
</
Window.CommandBindings>

<
Grid>
<
Grid.RowDefinitions>
<
RowDefinition />
<
RowDefinition />
</
Grid.RowDefinitions>
<
TextBlock x:Name="Comparison"
Grid.Row="0"
Text="Car Comparison"
VerticalAlignment="Bottom"
HorizontalAlignment="Center"
Foreground="White"
Background="Blue">
<
s:ElementMenu Name="MainMenu"
VerticalAlignment="Bottom"
ActivationMode="HostInteraction"
ActivationHost="{Binding ElementName=Comparison}">
<
s:ElementMenuItem Header="Honda">
<
s:ElementMenuItem x:Name="MenuItem1"
Header="Civic"
Click="MenuItem1_Click" />
<
s:ElementMenuItem Header="CRV"
Command="local:SurfaceWindow1.MenuItemCommand" />
<
s:ElementMenuItem Header="City"
Click="MenuItem1_Click" />
<
s:ElementMenuItem Header="Accord"
Command="local:SurfaceWindow1.MenuItemCommand" />
</
s:ElementMenuItem>
</
s:ElementMenu>
</
TextBlock>
<
TextBlock x:Name="CarDetails"
Height="200"
Width="200"
Grid.Row="1"
Text="Car Details"
VerticalAlignment="Center"
Background="DarkRed"
HorizontalAlignment="Center" />
</
Grid>
</
s:SurfaceWindow>
and code behind like(using directives removed),

namespace MySurfaceApplication
{
/// <summary>
///
Interaction logic for SurfaceWindow1.xaml
/// </summary>
public partial class SurfaceWindow1 : SurfaceWindow
{
public static readonly RoutedCommand MenuItemCommand = new RoutedCommand();
/// <summary>
///
Default constructor.
/// </summary>
public SurfaceWindow1()
{
InitializeComponent();
// Add handlers for Application activation events
AddActivationHandlers();

}


/// <summary>
///
Occurs when the window is about to close.
/// </summary>
/// <param name="e"></param>
protected override void OnClosed(EventArgs e)
{
base.OnClosed(e);

// Remove handlers for Application activation events
RemoveActivationHandlers();
}

/// <summary>
///
Adds handlers for Application activation events.
/// </summary>
private void AddActivationHandlers()
{
// Subscribe to surface application activation events
ApplicationLauncher.ApplicationActivated += OnApplicationActivated;
ApplicationLauncher.ApplicationPreviewed += OnApplicationPreviewed;
ApplicationLauncher.ApplicationDeactivated += OnApplicationDeactivated;
}

/// <summary>
///
Removes handlers for Application activation events.
/// </summary>
private void RemoveActivationHandlers()
{
// Unsubscribe from surface application activation events
ApplicationLauncher.ApplicationActivated -= OnApplicationActivated;
ApplicationLauncher.ApplicationPreviewed -= OnApplicationPreviewed;
ApplicationLauncher.ApplicationDeactivated -= OnApplicationDeactivated;
}

/// <summary>
///
This is called when application has been activated.
/// </summary>
/// <param name="sender"></param>
/// <param name="e"></param>
private void OnApplicationActivated(object sender, EventArgs e)
{
//TODO: enable audio, animations here
}

/// <summary>
///
This is called when application is in preview mode.
/// </summary>
/// <param name="sender"></param>
/// <param name="e"></param>
private void OnApplicationPreviewed(object sender, EventArgs e)
{
//TODO: Disable audio here if it is enabled

//TODO: optionally enable animations here
}

/// <summary>
///
This is called when application has been deactivated.
/// </summary>
/// <param name="sender"></param>
/// <param name="e"></param>
private void OnApplicationDeactivated(object sender, EventArgs e)
{
//TODO: disable audio, animations here
}

private void MenuItem1_Click(object sender, RoutedEventArgs e)
{
CarDetails.Text = (e.OriginalSource as ElementMenuItem).Header.ToString();
}

private void CommandBinding_Executed(object sender, ExecutedRoutedEventArgs e)
{
CarDetails.Text = (e.OriginalSource as ElementMenuItem).Header.ToString();
}
}
}

Build and Run the application.thumbs_up

Friday, May 15, 2009

Tagged Objects in Microsoft Surface – TagVisualizer,TagVisualization,TagVisualizationDefinition

Microsoft introduced a new concept called Tag driven application or Tagged Objects in Surface SDK through which the surface can identify Objects placed over the surface table.Object is printed with some tags that surface engine can read.Tags are either Byte Tags or Identity Tags.

How we can achieve this using Surface SDK?Let’s have a look at that.
I tried a sample by using Tagged Objects in Surface SDK.

Tag Visualization is possible by using these three classes,

  • TagVisualizer – is what actually responding to the Tagged Object and showing up the TagVisualization when placing a tag.
  • TagVisualization - is what we are showing in the surface when a tag is placed in the surface.
  • TagVisualizationDefinition – is using for defining the tag value to which the TagVisualizer will respond and also source, physical location,orientation and other properties of the visualization.

So Let’s try a sample.

  • Create a Surface project from the Visual Studio 2008 Template.
  • In the SurfaceWindow1 add a TagVisualizer.
<s:TagVisualizer Name="TagVisualizer">


</s:TagVisualizer>
  • Add a TagVisualization to the project.Add New Item>TagVisualization.I created TagVisualization SampleTagVisualization,

<s:TagVisualization x:Class="MySurfaceApplication.SampleTagVisualization"        
xmlns="http://schemas.microsoft.com/winfx/2006/xaml/presentation"
xmlns:x="http://schemas.microsoft.com/winfx/2006/xaml"
xmlns:s="http://schemas.microsoft.com/surface/2008"
Loaded="SampleTagVisualization_Loaded">
<
Grid Height="400"
Width="600"
Background="White">
<
TextBlock Text="Some Tagged Object UI here."
VerticalAlignment="Center"
HorizontalAlignment="Center"
Foreground="Red" />
</
Grid>
</
s:TagVisualization>
  • Add TagVisualizationDefinition to SurfaceWindow1 for TagVisualizer.We can add this either by XAML or from code behind,

Either From XAML,


<s:TagVisualizer Name="TagVisualizer">
<
s:TagVisualizer.Definitions>
<
s:ByteTagVisualizationDefinition Value="192"
Source="SampleTagVisualization.xaml"
UsesTagOrientation="True"
TagRemovedBehavior="Fade"
PhysicalCenterOffsetFromTag="7.5,4.5"/>
</
s:TagVisualizer.Definitions>
</
s:TagVisualizer>
or From code behind,(add it in the constructor)

ByteTagVisualizationDefinition tagVisualizationDefinition = new 
ByteTagVisualizationDefinition
();
tagVisualizationDefinition.Value = 192;
tagVisualizationDefinition.Source = new Uri("SampleTagVisualization.xaml",
UriKind.Relative);
tagVisualizationDefinition.UsesTagOrientation = true;
tagVisualizationDefinition.TagRemovedBehavior = TagRemovedBehavior.Fade;
tagVisualizationDefinition.PhysicalCenterOffsetFromTag = new
Vector
(7.5, 4.5);
TagVisualizer.Definitions.Add(tagVisualizationDefinition);
Build and Run the application in Surface Simulator.Tag Value is here 192.So give Tag Value as C0 (Hexadecimal).

Thursday, April 30, 2009

ScatterView in Microsoft Surface SDK

Microsoft SDK provides a control named ScatterView which acts like a container and we can move,resize or rotate the object which is placed inside the ScatterView Container.There is no need to create events or code for doing this.ScatterView will automatically handle all the Events.Definitely users will find this as a very cool feature.I created my first Surface application with ScatterView.Its pretty simple doing this and of course cool.

  • Create a Surface Project from Visual Studio Template.
  • Add ScatterView Control.

ScatterView contains collection of ScatterViewItem.Add Objects to ScatterView either inside a ScatterViewItem or we can directly add objects to the ScatterView.

The ScatterView looks either like,

<s:ScatterView>
<s:ScatterViewItem Width="200" Height="200" Center="500,300"
Orientation="315" >
<Image Source="Images/Forest.jpg" Stretch="Fill"></Image>
</s:ScatterViewItem>
</s:ScatterView>

OR like,

<s:ScatterView>
<Image Source="Images/Forest.jpg" Stretch="Fill"></Image>
</s:ScatterView>

I am adding an Image to the ScatterView so that we can manipulate like resize,rotate or move the image.


Monday, April 27, 2009

IValueConverter in WPF

Converters are mainly using in WPF when there is a need to convert a value to another value just like converting a Boolean to Visibility.

public class CustomConverter : IValueConverter
{
#region IValueConverter Members

public object Convert(object value, Type targetType, object parameter,
CultureInfo culture)
{
if (value ==null)
return false;
return true;

}

public object ConvertBack(object value, Type targetType, object parameter,
CultureInfo culture)
{
throw new NotImplementedException();
}

#endregion
}

Here CustomConverter is implementing IValueConverter.We can use this converter in the XAML.First add this Converter in the resources,
<local:CustomConverter x:Key="CustomConverter" />
where local is the reference to the assembly where CustomConverter is defined.
Use this Converter in Controls DataBinding like,
IsEnabled="{Binding ElementName=ListBoxName, Path=SelectedItem,
Converter={StaticResource CustomConverter}}"

Friday, March 20, 2009

First Look – Microsoft Silverlight 3

Wednesday, March 11, 2009

WCF Tutorial

WCF concepts include ABC i.e.,
  • A - Address
  • B - Binding
  • C – Contract
Services are building on windows communication foundation’s System.ServiceModel assembly in location
C:\Windows\Microsoft.NET\Framework\v3.0\Windows Communication Foundation.
You can find some sample applications in some of my articles. Samples consist of a WCF service and a silverlight client that consumes the service. You'll get a basic concept of WCF from those samples.
Download Sample Application,
You'll get more samples from MSDN, Download Samples
MSDN Tutorials for WCF,

How to: Define a Windows Communication Foundation Service Contract
How to: Implement a Windows Communication Foundation Service Contract
How to: Host and Run a Basic Windows Communication Foundation Service
How to: Create a Windows Communication Foundation Client
How to: Configure a Basic Windows Communication Foundation Client
How to: Use a Windows Communication Foundation Client

Tuesday, March 10, 2009

Remove Binding in WPF code-behind

We can remove binding from a dependency property of a dependency object from code behind using,

BindingOperations.ClearBinding(sliderRange, Slider.ValueProperty);
In this snippet, we are removing binding from Value Property of Slider sliderRange.

Monday, March 2, 2009

Tag Mapping in ASP.NET

Tag mapping is using for mapping two controls of compatible type so that it'll map to the mapped control.Suppose we are creating a custom panel having some custom functionality like,

public class CustomPanel : Panel
{
//Code here//
}
Now we can map all panels to our custom panel so that normal panel will get functionality of custom panel.In web.config,

<pages>
<tagMapping>
<clear />
<add tagType="System.Web.UI.WebControls.Panel"
mappedTagType="CustomPanel"/>
</tagMapping>
</pages>

Sunday, March 1, 2009

Image & Sound in Validator Controls

I am going to give code snippets for a very interesting trick.ie,to display image or sound instead of validation message in ASP.NET Validation controls.

Displaying image

<asp:requiredfieldvalidator id="reqPercentage" runat="server" errormessage='<img src="image.gif">' controltovalidate="txtPercentage">
</asp:requiredfieldvalidator>


for displaying image instead of text we are giving an img tag with src set to a image in our application.so when validation is failed it'll show image instead of text.

Sound in Validation Control

<asp:requiredfieldvalidator id="reqPercentage" runat="server"
errormessage='<
bgsound src="sound.wav"
>' controltovalidate="txtPercentage">
</asp:requiredfieldvalidator>


And also disable client side script for textbox.Run the application yo'll see the change.

Friday, February 27, 2009

Microsoft Surface - Physics Engine

Thursday, February 26, 2009

Avoid Multiple Form Submits

Multiple form submits is a serious issue in web applications because it’ll result in unexpected behavior like multiple entries in database .I have spent some time for the same in Google and I got some solutions for that.
If you are submitting the page only once then you can use,

<form onsubmit="return Submit();">
And the method is like,
<script type="text/javascript">
var flag = false;
function Submit() {
if (flag) {
return false;
}
else {
flag = true;
return true;
}
}
</script>
For a single button you can use,
btnSubmit.Attributes["onclick"] = "this.disabled=true;" + GetPostBackEventReference(btnSubmit);
For pages with update panels multiple submit is a serious issue as page is posting asynchronously or partially.In that scenario you can use Sys.WebForms.PageRequestManager for fixing the issue,
<asp:ScriptManager ID="ScriptManager1" runat="server">
</asp:ScriptManager>
<script type="text/javascript">
Sys.WebForms.PageRequestManager.getInstance().add_beginRequest(BeginRequest);
function BeginRequest(sender, e) {
e.get_postBackElement().disabled = true;
}
</script>

Wednesday, February 18, 2009

Microsoft Surface Promo


Surface Promo from IdentityMine on Vimeo.

IdentityMine Wine Guide Solution - Tesco Wine Fair


IdentityMine Wine Guide Solution - Tesco Wine Fair from IdentityMine on Vimeo.

Microsoft PDC 2008 Surface App by IdentityMine

Monday, February 16, 2009

Fixing Problem with long Text in TextBox when width as percentage.

Usually when we set width as percentage for textboxes, we'll face an issue in IE. ie,while displaying long text, the length of the textbox will increase as according to the text length.So the whole design will collapse.Here is the solution,

Use css class for the table which contains the textbox,

        .table
{
table-layout: fixed;
}

Friday, February 13, 2009

Moonlight 1.0 Released

Moonlight 1.0 enables linux users to use silverlight applications.

Check links,

http://tirania.org/blog/archive/2009/Feb-11.html

http://weblogs.asp.net/scottgu/archive/2009/02/11/moonlight-1-0-release.aspx#6899578

:-)

Thursday, February 12, 2009

Sharepoint Webpart Development Part 1

Here we can discuss about Sharepoint web part development.

  • Open Visual Studio.Add new project.
  • Either you can use Web Part Template in Visual Studio by selecting WebPart project while adding new project or alternatively you can simply create a class library and inherit class from System.Web.UI.WebControls.WebParts.WebPart or Microsoft.SharePoint.WebPartPages.WebPart(Needs Microsoft.Sharepoint.Dll).

  • public class TestWebPart : Microsoft.SharePoint.WebPartPages.WebPart
    {
    public string FirstName{ get; set; }

    protected override void Render(System.Web.UI.HtmlTextWriter htmlTextWriter)
    {
    base.Render(htmlTextWriter);

    //Custom Render Code comes here.//
    }
    }
    So property FirstName will be showed in the property grid editor with a textbox.If you have a boolean property it'll be showing as checkbox in the property grid of the web part.For enumeration it'll be DropDownlist.So it have default Tool Part behavior.But we can create custom Tool Part in web part.

    That I'll show in the next post.

    Monday, February 2, 2009

    Export Word Document in ASP.NET

    Here we are exporting the data from a grid to word,


    Response.Clear();
    Response.Buffer = true;
    Response.AddHeader("Content-Disposition", "attachment;filename=Test.doc");
    Response.ContentType = "application/ms-word";
    StringWriter stringWriter = new StringWriter();
    HtmlTextWriter htmlTextWriter = new HtmlTextWriter(stringWriter);
    gvwEmployeeGrid.RenderControl(htmlTextWriter);
    Response.Output.Write(stringWriter.ToString());
    Response.Flush();
    Response.End();


    Make EventValidation to false for the page and also override VerifyRenderingInServerForm in code behind,


    public override void VerifyRenderingInServerForm(Control control)
    {

    }

    Sunday, February 1, 2009

    How to Work With Microsoft Surface Simulator

    Microsoft Surface is a new emerging technology developed by Microsoft through which we can process objects through hand in a real user interaction.

    About Microsoft Surface,

    http://www.microsoft.com/surface/en/us/default.aspx

    http://en.wikipedia.org/wiki/Microsoft_Surface

    After installing the Surface SDK you can see a Simulator installed in your Vista machine.

    I think it’s really nice to test your application in that which acts much like a surface table.

    Add New Project by using Surface Application template in Visual Studio which is installed through Surface SDK. After developing your surface application start the simulator and then run the application so that you can see and test the application in the same. Ensure that Simulator is running when your application runs. Otherwise you won’t get the tools from simulator as it’ll launch in some other way. And also all part of the simulator panel should be visible above all other windows/taskbar Otherwise simulator will display a message like “simulation is disabled because the simulator is partly obscured”.

    Surface Simulator has tools like a Contact Selector, Finger, Resizable Blob, Tag & Identity Tag.

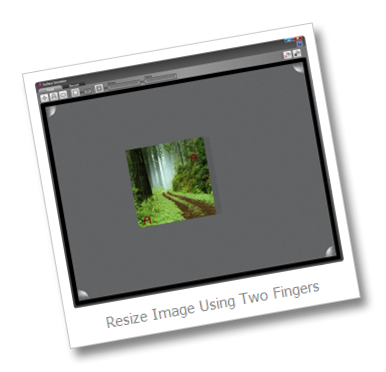
    If you want to produce a two finger object action like resizing an image you can simply do that by fixing a finger tool by clicking right mouse button along with pressing down left mouse button. And then do the second finger object action by using second finger tool. If you scroll the mouse wheel then you can see the tools rotating in clockwise or anticlockwise.

    I tried some samples in this simulator which gives a much near real experience.

    Left Outer Join in LINQ

    var result = from accountDetails in context.AccountDetails
    join payment in context.PaymentDetails
    on accountDetails.AccountID equals payment.AccountID into temp
    from resultDetails in temp.DefaultIfEmpty()
    select new { temp.PayeeName,temp.AccountType };

    Friday, January 23, 2009

    Event Logs

    We can create event logs using System.Diagnostics.

    Application Log


    EventLog eventLog = new EventLog("Application");
    eventLog.Source = "MyApp";
    eventLog.WriteEntry("Application Started", EventLogEntryType.Information);
    Security Log

    EventLog eventLog = new EventLog("Security");
    eventLog.Source = "MyApp";
    eventLog.WriteEntry("Application Started", EventLogEntryType.Information);

    System Log

    EventLog eventLog = new EventLog("System");
    eventLog.Source = "MyApp";
    eventLog.WriteEntry("Application Started", EventLogEntryType.Information);

    Thursday, January 22, 2009

    Code Names of Visual Studio.NET

    • Visual Studio .NET (2002) - Rainier
    • Visual Studio .NET 2003 - Everett
    • Visual Studio 2005 - Whidbey
    • Visual Studio 2008 - Orcas
    • .NET 3.0 Framework - WINFX
    • Visual Studio 2010 - HawaiiRefer links
    Refer links,

    1. http://en.wikipedia.org/wiki/Microsoft_Visual_Studio
    2. http://en.wikipedia.org/wiki/List_of_Microsoft_codenames

    Object Initializer

    var objList = (from info in someList
    select new YourClassName
    {
    Property1 = info.Property1,
    Property2 = info.Property2,
    } into newInfo
    select newInfo).AsEnumerable();

    where YourClassName is the name of your class you want to initialize.And Property1, Property2 are properties inside the class.

    Wednesday, January 21, 2009

    Process in .NET

    We can get processes in a machine by using Process class.


    Process[] process = Process.GetProcesses();
    foreach (Process pro in process)
    {
    Console.WriteLine(pro.ProcessName);
    }

    or processes by name,

    Process[] process = Process.GetProcessesByName("devenv");
    foreach (Process pro in process)
    {
    Console.WriteLine(pro.SessionId);
    }

    Tuesday, January 20, 2009

    Compression Using GZipStream

    Compression is very much important in many cases.We can even compress our ViewState so that we can increase the performance of application Here i am going to give code snippets for compression using GZipStream.

    FileStream inStream = File.OpenRead(inputFileName);
    FileStream outStream = File.Create(outputFileName);
    GZipStream gZipStream = new GZipStream(outStream, CompressionMode.Compress);

    int bytes = inStream.ReadByte();

    while (bytes1 = -1)
    {
    gZipStream.WriteByte(bytes as byte);
    bytes = inStream.ReadByte();
    }

    :-)

    Monday, January 19, 2009

    ICallbackEventHandler

    Here i am going to give code snippets for ICallbackEventHandler through which we can make asynchronous calls to server so that we can avoid post back of the web page.

    Firstly we have to implement the interface ICallbackEventHandler,

    public partial class _Default : System.Web.UI.Page, ICallbackEventHandler
    then we have to implement two methods in the interface ICallbackEventHandler,

    • GetCallbackResult
    • RaiseCallbackEvent
      #region ICallbackEventHandler Members

    public string GetCallbackResult()
    {
    return result;
    }

    public void RaiseCallbackEvent(string eventArgument)
    {
    result = "Call Back Result";
    }

    #endregion
    Here for simplicity i am returning a static data.You can return dynamic data also.Then you need to Get Call back Event Reference through Page.ClientScript

    string callback = ClientScript.GetCallbackEventReference(this, "arg", "GetName", "context");
    string script = "function CallBack(arg,context){" + callback + ";}";
    ClientScript.RegisterClientScriptBlock(this.GetType(), "CB", script, true);
    so now our class look like this,

    using System;
    using System.Configuration;
    using System.Data;
    using System.Linq;
    using System.Web;
    using System.Web.Security;
    using System.Web.UI;
    using System.Web.UI.HtmlControls;
    using System.Web.UI.WebControls;
    using System.Web.UI.WebControls.WebParts;
    using System.Xml.Linq;

    public partial class _Default : System.Web.UI.Page, ICallbackEventHandler
    {
    public string result;
    protected void Page_Load(object sender, EventArgs e)
    {
    string callback = ClientScript.GetCallbackEventReference(this, "arg", "GetName", "context");
    string script = "function CallBack(arg,context){" + callback + ";}";
    ClientScript.RegisterClientScriptBlock(this.GetType(), "CB", script, true);
    }

    #region ICallbackEventHandler Members

    public string GetCallbackResult()
    {
    return result;
    }

    public void RaiseCallbackEvent(string eventArgument)
    {
    result = "Call Back Result";
    }

    #endregion
    }
    Now add one textbox and one HTML Button to the designer.For call back we should use HTML Button.In the onclick event of HTML Button call the javascript method GetValue();

    Our Javascript code looks like,

    function GetValue()
    {
    CallBack();
    }
    function GetName(arg,context)
    {
    document.getElementById('txtPercentage').value=arg;
    }
    Build and Run the application.Now while clicking HTML Button the textbox is populated with the value from the server without posting the page.
    This is very useful in practical scenarios.

    For more details, visit http://msdn.microsoft.com/en-us/library/system.web.ui.icallbackeventhandler.aspx

    Group By in LINQ

    Here is a sample to show how we can do Group By operation using LINQ,

    var listInfo = (from infoResult in context.Results
                    where infoResult.ResultID == resultID
                    group infoResult by new
                    { infoResult.SomeID, infoResult.Name } into newInfo
                    select new ClassName
                    {
                       SomeID = newInfo.Key.SomeID,
                       Name = newInfo.Key.Name,
                       Count = newInfo.Count(),
                       TotalCount = (from infoResult2 in context.Results
                                     where infoResult2.ResultID== resultID
                                     select infoResult2).Count()
                    }).AsEnumerable();

    Tuesday, January 13, 2009

    Reading from Cookies

    Cookies are a nice feature to store data in client side so that we can manage the state in the client side.

    Reading from Cookies


    protected void Page_PreInit(object sender, EventArgs e)
    {
    if (Request.Cookies["Theme"] == null)
    {
    Response.Cookies["Theme"].Value = "ThemeName";
    Response.Cookies["Theme"].Expires = DateTime.Now.AddDays(2);
    }
    else
    this.Theme = Request.Cookies["Theme"].Value.ToString();
    }

    ROW_NUMBER()

    ROW_NUMBER() is using for retrieving the row numbers just like displaying in the result pane.

    Select * from
    (Select *,ROW_NUMBER() OVER(ORDER BY EmployeeID) as RowNumber
    from Employee)Temp

    where RowNumber BETWEEN 2 AND 4

    Parsing XML in SQL - OPENXML

    We can parse XML Documents from SQL using OPENXML. Before that we use an sp named sp_xml_preparedocument.
    EXEC sp_xml_preparedocument @doc OUTPUT, @doc
    SELECT EmployeeID,EmployeeName
    FROM   OPENXML (@doc, '/EmployeeList/Employee')
    WITH
       (
          EmployeeID  varchar(10),
          EmployeeName varchar(150)
       )
    We can even use INNER JOIN or many other queries on OPEN XML.
    For bulk data updation or insertion this query is very useful to parse the input XML Data.

    State Management - HTTPContext.Current.Items

    We can store Objects in HTTPContext.Current.Items for small usages.we can add objects into Items collection just like normal Collections we are using.


    LIST listEmployee = HTTPContext.Current.Items as LIST;

    if(listEmployee == null)
    {
    listEmployee = Getyourdata();
    HTTPContext.Current.Items["Key"] = listEmployee ;
    }

    Cross Page Posting

    By using cross Page Posting We can access controls or properties in the previous page from the current page.

    Suppose We have a textbox in Default.aspx named txtName,So create a property returning its text,


    public string Name
    {
    get
    {
    return txtName.Text;
    }
    }
    we have a hyperlink and its NavigateUrl is default2.aspx.
    In Default2.aspx set PreviousPageType in the source,

    <%@ PreviousPageType VirtualPath="~/New/Default.aspx"%>
    and in the code behind access the property Name from the first page like this,

    if (IsCrossPagePostBack)
    {
    lblName.Text= PreviousPage.Name;
    }
    in the second page.